Friday, November 2, 2012

Peanut Butter Cookies (4 ingredients!)


This recipe for Peanut Butter Cookies with only four ingredients hit Pinterest like wildfire recently so of course I jumped on the bandwagon and pinned it.  As I've said before, I think I have hundreds of recipes pinned on my "to try" board (yup, just checked.... 639 to be exact) but only a small percentage of them will I actually try.  This one I had a feeling I would and when my sister told me she tried them and liked them, I knew it was time!

Here's my favorite part about this recipe.  It doesn't use flour, butter, or oil!  I go through those ingredients SO fast at this time of year when I do so much baking.  If I come across a recipe for cookies that doesn't use those things, I know I have found a winner!  This is also a great option for our gluten free friends out there.

This recipe is very easy and you can whip it up FAST!  I only got 16 cookies out of it so if you want more, just double it.  Enjoy, and let me know how yours turn out!

Ingredients:

  • 1 cup peanut butter
  • 1 cup sugar
  • 1 egg
  • 1 teaspoon vanilla extract

Directions:

  • Heat oven to 350 degrees.
  • Combine all ingredients with mixer.
  • Drop tablespoonfuls onto baking sheet.
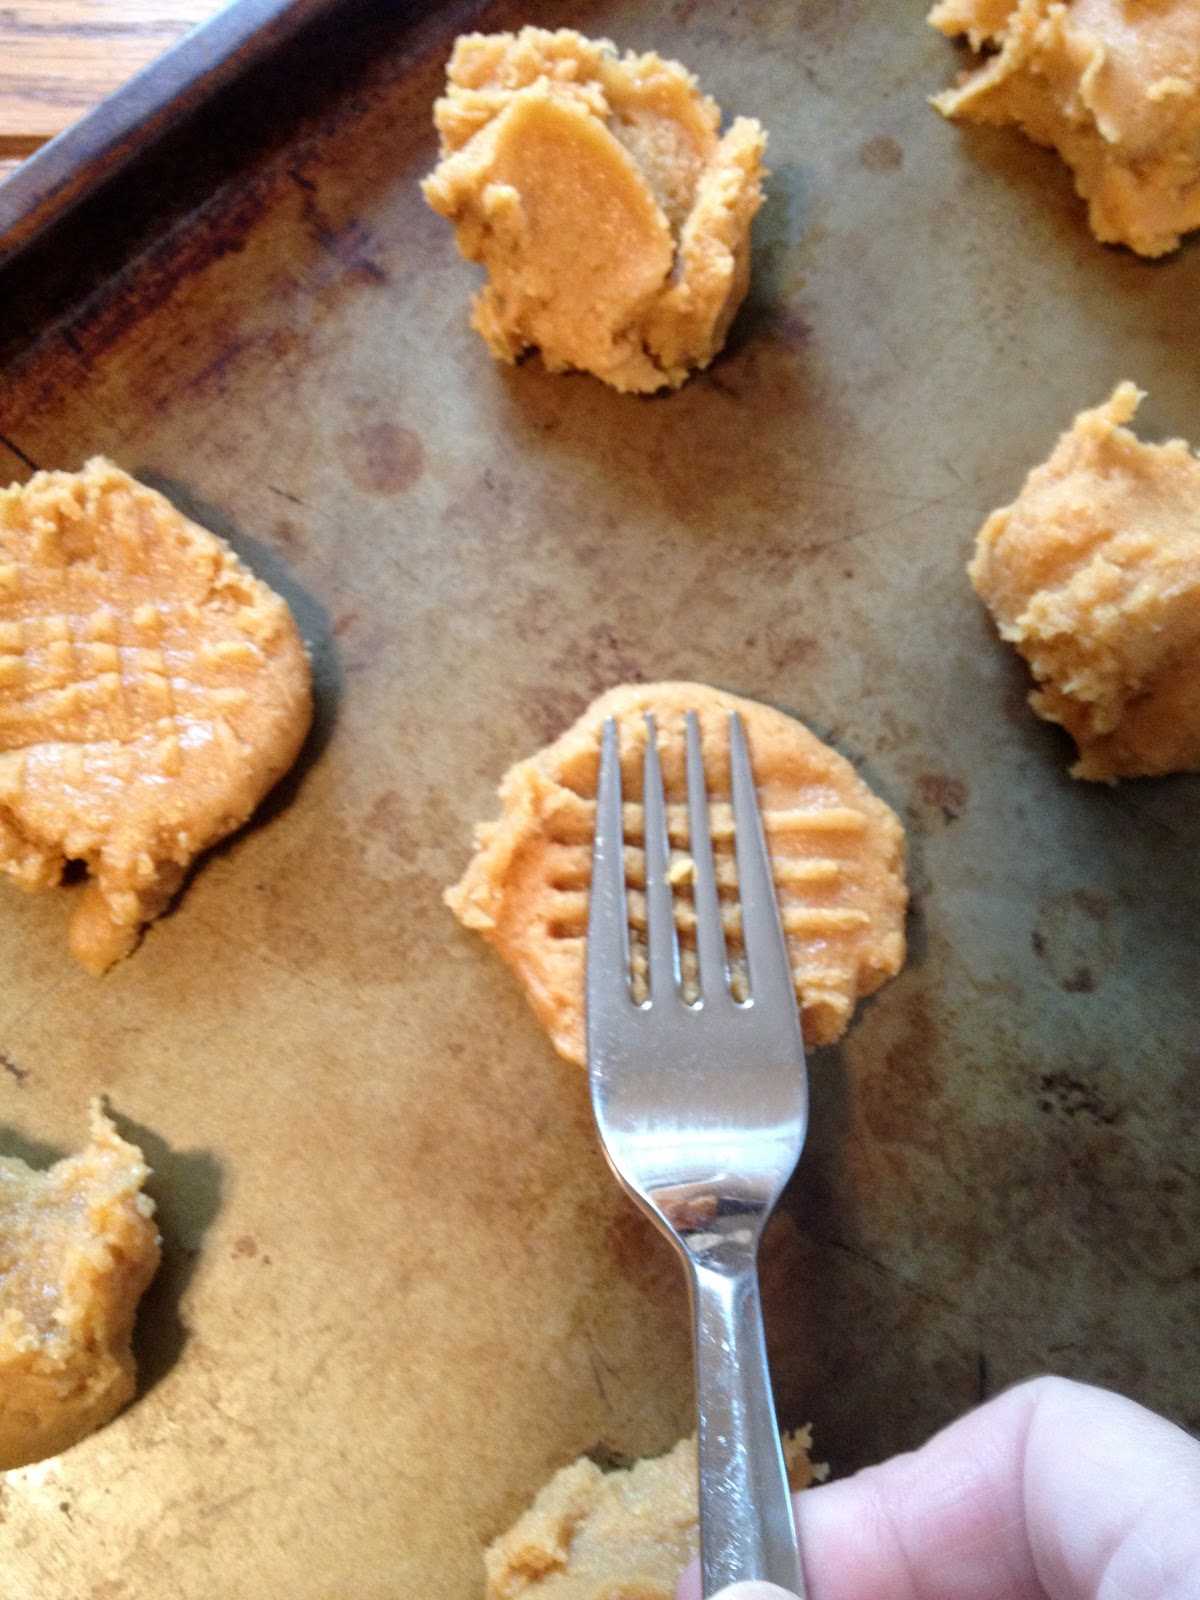
  • Use fork to flatten dough in crisscross pattern.
  • Bake for 10-12 minutes until golden brown around the edges.
  • Let sit for 2 minutes on baking sheet prior to moving to wire rack.

You can find the original recipe here.


Thursday, November 1, 2012

Soap Clouds and Bath Soaps

You may have heard that Ivory Soap floats... but did you know it could do this??


Yup!  Just a minute or two in the microwave and you have a soap cloud!

And a with a little bit of added water, food coloring, and handiwork you have some fun soaps for bath time!


What you need:

  • a bar of Ivory soap
  • wax paper
  • microwave
  • water
  • food coloring
  • cookie cutters

What to do:

  • Place the unwrapped soap on some wax paper in the microwave
  • Microwave for 2 minutes, watching it grow (it might take less that two minutes... the cloud above was from about one minute but I stopped it a little prematurely... when it stops growing, it's done)
  • Have fun exploring!  What does it look like?  How does it smell?  How does it feel?  You can try coloring it, painting it, crushing it, etc...
  • To make soaps, crush the cloud into a bowl
  • Add a little water and stir/squish together until it's the consistency of pie crust
  • Add a drop or two of food coloring if desired
  • Squish into cookie molds and let dry 


Some notes:

  • Only Ivory works with this so don't try other kinds.  If you read comments on other blogs featuring this activity you will see that not only will other kinds of soap be unsuccessful, they may be dangerous.  
  • The fresher the soap the better.
  • Do not leave this unattended in the microwave.  If it gets too big or starts smoking, turn it off!
  • Put the soap on a piece of wax paper, plastic wrap, paper towel in the microwave.  Do not use foil!
  • Be careful taking it out of the microwave just in case it's hot.  Mine hasn't been hot but I would hate for someone to try this, get burned, and tell me I should have warned them...

You can find the original post where we got our ideas here and you can read about the physics of Ivory Soap here.  Have fun!

Wednesday, October 31, 2012

Crock Pot Chicken Alfredo

I pulled this yummy meal together the other day with random things I found around my kitchen.  I would make a couple of changes for next time, but overall, it was very good!


Ingredients:

  • 3 pounds frozen boneless chicken breasts (if yours are thawed, don't cook as long)
  • 2 jars alfredo sauce
  • 1 box frozen spinach (optional... I used it and got feedback from my husband that we could cut back on or skip the spinach... I was not surprised to hear him say this!  I actually thought I could "hide" the spinach in this dish, but clearly it is not hidden.  I suppose it's all up to your personal taste.  I like it with the spinach!)
  • 1 onion, chopped
  • 1-2 cloves of garlic, pressed (I did not use this and as soon as both my husband and I tasted this we looked at each other and said "This needs garlic!"  We added garlic salt over top, but it would have been yummier cooked in.)
  • My husband also suggested adding some artichokes to this which I thought would be a great idea for next time!  YUM!

Directions: 
(This is just what I did, basically throwing things in as I found them and making it up as I went.  It's easy to be creative with a crock pot, so have fun!)

  • Put frozen chicken in crock pot
  • Pour sauce over top
  • Dump chopped onion on top
  • Put the frozen spinach on top
  • Don't forget your garlic!
  • Cook on low 8-ish hours (I did high for 2 hours, low for 4 hours because I got started late.  Generally, 2 hours on low = 1 hour on high.  Just test the meat with a thermometer to be sure it's done.)
  • I broke up and sort of shredded my chicken in the end but you can do whatever you prefer.
  • Serve over pasta, couscous, or rice.

The 3 pounds of chicken served four adults and one child with plenty of leftovers.  Cut the recipe in half if you need to.  Trying to separate 3 pounds of frozen chicken before cooking is nearly impossible!

Monday, October 29, 2012

Homemade Finger Paints

The impending arrival of a hurricane calls for some new indoor fun!  We get stir crazy very quickly over here with a two year old who would spend all day and night outside if she could.  I found this recipe for homemade finger paints on Pinterest several months ago and decided today was the day to try it.


This stuff is fantastic!!

I was nervous that my daughter wouldn't be too into the idea of finger painting.  We have never tried it before but I find her to be a little sensitive to different textures so I have always figured finger painting would not interest her.  I was very wrong.


The texture of this is kind of goopy, not chunky, not too wet, and it did not stain our fingers.  We used regular paper to paint on and it was just fine.  Leftover paint should be stored in airtight containers and some of the comments on the original blog suggested storage in the fridge as they noticed mold after a few days on the counter.  I have a feeling we might use the rest of ours up this afternoon.

You can find the original recipe here or follow along below:

Ingredients:
3 tablespoons sugar
1/2 teaspoon salt
1/2 cup corn starch
2 cups water


Directions:
Combine ingredients in small saucepan
Stir over medium heat until mixture thickens (kind of like making gravy)
Cool and scoop into containers
Add food coloring (I bet you could use Kool Aid too!)


Friday, October 26, 2012

Apple Muffins

I was on a mission yesterday to find a new recipe for another breakfast treat with apples.  My inspiration?  I asked my husband what he would like me to bake.  His response was that I have worked hard and should rest.  My response, knowing that it sometimes feels like rest to bake for my family was that I was baking so he should submit a request... and he did.  Something for breakfast and something with apples.  Most days, baking or cooking up something special for my family is relaxing (not always, but mostly) and rewarding.  It's one of the ways I feel connected to them, one of the ways that I feel I take care of them, and that feels good!  It's one of the ways I take time for today.


So anyway, I found this recipe for Apple Spice Muffins.   These were easy to make and delicious!  I did not find them to have that fall "spice" to them that I was hoping for so I will probably switch some things up next time.  But I will post the recipe below as I followed it this time.

Ingredients for muffins:
  • 1 3/4 cup flour
  • 1 cup sugar (plus a pinch)
  • 1 teaspoon baking powder
  • 1/2 teaspoon baking soda
  • 1/2 teaspoon salt
  • 1/2 teaspoon cinnamon (plus a pinch)
  • 1/8 teaspoon ground all spice (I used more like 1/4 teaspoon since I already had a feeling these wouldn't be spicy enough)
  • 3 eggs (lightly beaten)
  • 1/2 cup vegetable oil
  • 1 teaspoon vanilla extract
  • 1 1/2 cups apples (peeled, diced)
Ingredients for topping:
  • 2 tablespoons butter (melted)
  • 1/2 cup brown sugar
  • 1/3 cup flour
  • 1 teaspoon cinnamon
Directions:
  • Preheat oven to 350 degrees.
  • Line muffin pan with paper cups.
  • Toss apples with a pinch of cinnamon and sugar and set aside.
  • In a large mixing bowl sift flour, sugar, baking powder, baking soda, salt, cinnamon and all spice.
  • Make a well in the flour mixture and add eggs, vegetable oil and vanilla and mix well.
  • Fold in apples.
  • Pour mix into muffin pan, filling each cup about 2/3 full.
  • Stir together butter, brown sugar, flour, and cinnamon and sprinkle on top of muffins.
  • Bake for 23-27 minutes until tops are golden brown and toothpick inserted in center comes out clean (I took mine out after 25 minutes).


Thursday, October 25, 2012

Wax Paper Sun Catchers


As of today, this is our new favorite activity!  My two year old LOVED it and asked if we can do it more later after I prepare more supplies!

Here's what you'll need to make these colorful sun catchers...

  • wax paper
  • scissors
  • crayon shavings in little bowls
  • iron
  • old towel, tshirt, etc to iron on so that you don't get melted crayon all over your table and/or iron (it will get on the towel so don't use your best white one)

And this is what you'll do...

  • Use peeled crayons to make crayon shavings.  I tried using a vegetable peeler but was not too impressed.  It's possible but not as practical as a real crayon sharpener.  I didn't have a freestanding one but eventually found one on the back of a dry erase crayon box.  It did the trick but a regular crayon one would be even better.  Shave different colored crayons into little bowls.  I separated my colors but it really wasn't necessary because they were all combined within minutes.
  • Plug in your iron (out of reach of children).  I used mine on the opposite side of the table, on a towel.
  • Cut shapes out of wax paper.  You'll need two of each to make a crayon shaving sandwich out of them so put two pieces together to cut or if you are making a folded design like a butterfly or heart, fold two pieces of wax paper together so you're actually cutting through four sheets... know what I mean?
  • Give one side of the design to your child to decorate with crayon shavings.
  • Carefully move to the ironing area and cover with the other side of the design.
  • Fold over the towel and iron for 30 seconds or so - maybe more or less depending on how hot your iron is, how many shavings you need to melt, and how big your design is.  Just keeping checking it and when the crayon is melted and the pages are sticking together, it's done.
  • Remove from the towel (careful not to burn your hands) and admire the beautiful creation!


Wednesday, October 24, 2012

Sugar Cookies


I saw an idea for fall colored sugar cookie leaves on Pinterest and knew for sure I would be trying it out.  I was a little disappointed that there was no actual cookie recipe included so I went on a hunt for the very best sugar cookie recipe.  I have tried some in the past but have never really found a favorite.  I hunted online and asked around and when the one I found was the one that a friend also tried and loved, I decided it was the one (thank you, Alicia)!  Here is a link to the original recipe I used.  I cut it in half because I wasn't brave enough to try it all at once and have it be a fail so I will list below what I did.  I was impressed with these and will definitely use this recipe again.  You can make these cookies colored or plain (both are outlined below).

Ingredients:
  • 3/4 cup butter softened (take it out earlier in the day so it softens on it's own)
  • 1 cup white granulated sugar
  • 2 eggs
  • 1/2 teaspoon vanilla extract
  • 2 1/2 cups flour
  • 1 teaspoon baking powder
  • 1/2 teaspoon salt
Directions:
  • In large bowl, cream together butter and sugar until smooth.
  • Beat in eggs and vanilla.
  • Stir in the flour, baking powder, and salt.

 ** At this point you need to decide if you are making colored dough 
or plain dough.  I say "at this point" because I honestly had not 
decided until I got to this point either! **

If you are going to make colored dough....
  • Flour your hands and the surface you are working on (my dough was really sticky so flour is a must).
  • Split the dough into four equal sections.
  • Add drops of food coloring to each section (I used red, orange (red+yellow), yellow, and green).  I would suggest making four balls and then putting a thumbprint hole in the middle of each one to hold the food coloring.  I found this was the best way to minimize stains on my hands and food coloring dripping all over the place.  It took about 8 drops to get the dough as bright as I wanted it.
  • Put the colored balls in the fridge for one hour.
  • Take them out of the fridge, put pieces of different colors together like a patchwork quilt and roll flat to about 1/4 inch thickness.  Use a floured surface for this.  I'm a huge fan of my pastry cloth and rolling pin cover (thank you, April!) and highly recommend this little invention if you don't have one already!  
  • Use cookie cutters to cut out cookies and place on ungreased cookie sheets.
  • Bake for 5-6 minutes and remove to cool on wire rack.  Be careful not to overcook.  5 minutes was almost too much and next time I will lower the oven temperature.  You do not want them to be brown.


If you are not going to make colored dough....

  • Cover the dough you made and chill in the fridge for at least one hour.
  • Take dough out of the fridge, and roll flat to about 1/4 inch thickness.  Use a floured surface for this.  (see above for my pastry cloth shout out)                       
  • Use cookie cutters to cut out cookies and place on ungreased cookie sheets.
  • Bake for 5-6 minutes and remove to cool on wire rack.  (see above for my time and overcooking disclaimer)


Icing:
Mix the following together in a bowl and spread over cooled cookies.  If the consistency is off, just add more milk to make it thinner or more sugar to make it thicker.
  • 1 cup powdered sugar
  • 2-3 tablespoons milk
  • few drops of vanilla (I have no idea how much, just a little, I hardly ever measure!)


I had originally planned that this would be a Mommy-toddler activity but then decided that since I didn't really know how it was going to turn out, I would have it be a Mommy only activity with the exception of the decorating.  I'm glad I made that decision because rolled sugar cookies really aren't an instant gratification kind of cookie and my two year old would have never tolerated the fact that the dough had to sit in the fridge for an hour halfway through or that it was so sticky that I wouldn't have let her touch it.  Saving the decorating for her was a fantastic plan!  She had a blast painting on the icing and sprinkling on the decorations.  She only ate a few cookies along the way... double and tripled dipped in icing after the first lick, of course.  And then, for the grand finale, while I was putting the finished cookies away she mixed all the sugar decorations into the icing... YUM!  (never turn your back on a two year old!!)
Related Posts Plugin for WordPress, Blogger...