Wednesday, March 26, 2014

Minnie (or Mickey) Fruit Pizza

Please tell me you know it's true that everything tastes better when it's Minnie or Mickey themed!  When we were in the planning stages of our recent Disney Side @ Home Celebration, I searched Pinterest to find any possible Disney themed food to add to our spread.  I found this super cute Mickey Fruit Pizza idea from Craisins, also one of the sponsors of our party!  I used their idea as inspiration but used my own recipe, our favorite fruits, and some creative placement and came up with this beauty.


I will be honest that I had minimal fridge space with so many other treats already prepared so I pulled this decorating together within the 45 minute rush before our guests were scheduled to arrive.  I had prepared the cookie crust in advance the night before, whipped up the icing about a half hour earlier, and then assembled at the last minute.  I intended to follow the exact set up of the Craisins pizza but panicked that it wouldn't look like Mickey in the end so I skipped the face details and just made an outline of the head with the fruit.  I added the Minnie bow at the last second on a whim and am so glad I did!

Super cute, super colorful, and super easy!  This is such a fun and delicious treat.  Why wait for a Disney party?!  Surprise your family today!

Ingredients

Crust:
  • 2/3 cup shortening
  • 2/3 cup sugar
  • 1 egg
  • 1 teaspoon vanilla
  • 1 1/2 cups flour
  • 1/3 teaspoon baking soda
  • 1/2 teaspoon salt
Icing:
  • 8 ounce package of cream cheese, softenend
  • 2 tablespoons frozen limeade concentrate
  • 1/2 cup powdered sugar
Decorations:
  • purple grapes
  • green grapes
  • blueberries
  • strawberries
  • canned pineapple
  • canned mandarin oranges

Directions

Crust:
  • Mix shortening, sugar, egg, and vanilla with electric mixer until fluffy
  • Add flour, baking soda, and salt, and mix gently with a spoon until combined with wet ingredients
  • Spread by hand onto a greased pizza pan
  • Bake at 375 for 12 minutes
  • Cool completely
  • (I prepared this the night before and stored covered on the counter.)
Icing:
  • Beat cream cheese, limeade, and powdered sugar with an electric mixer on medium speed until smooth
  • Spread on crust
  • (Original instructions from Pillsbury suggest that you serve immediately or refrigerate up to 2 hours prior to serving.  I didn't spread it the night before because I didn't want the crust to get soggy before the party.)
Decorations:
  • Cut fruit into bite sized pieces (we had 3-4 year olds at our party so I wanted to make sure those grapes were quartered, etc)
  • Lightly trace outline of the mouse head in the icing with a knife and then place your fruit accordingly!
  • It's so easy, and if you mess up, just start over.  This is fool proof... you can do it!

We kept our fruit pizza intact until we just couldn't bear the wait of eating it any longer and then we sliced with a pizza cutter.  Next time I may try to cut the pizza after icing and before decorating so that it stays pretty longer.  I'm not sure whether it would work but it might be worth a try.  If you try it, let me know how it goes!

We stored out leftovers covered in the fridge.  It does get a little bit soggy but still delicious... you just wouldn't want to serve the leftovers to guests necessarily.  It's best served fresh!

Recipe adapted from Craisins, Pillsbury, and a recipe I got years ago from a friend!

Special thanks to Keiko S. Dowell Photography for the image!

Enjoy!


Wednesday, March 12, 2014

Our Disney Side @ Home Celebration!

I received free products in order to host the Disney Side @ Home Celebration.
The opinions expressed here are my own.

Just a little over a week ago we hosted our Disney Side @ Home Celebration.  I've thought about blogging about it every day since then but I think I needed this time to decompress after all that fun!  This experience was such a whirlwind of excitement, one in which we have been so grateful to participate!

Let me start by saying thank you to the amazing sponsors that were involved in this promotion... Disney Parks, Mom Select, American Tourister, Ocean Spray, HP, ESPN/Run Disney, ABC's The Chew.  I also want to thank my sweet friend Keiko, from Keiko S. Dowell Photography who so artistically and touchingly captured the joy of this day in photographs for us without even being asked to do so.  Actually, will you go give Keiko some facebook love to help me thank her?  There are more pictures from our party to see there too!  And thank you SO MUCH to all of our special friends who joined us in showing our Disney Side!  We would not have had nearly as much fun without you!

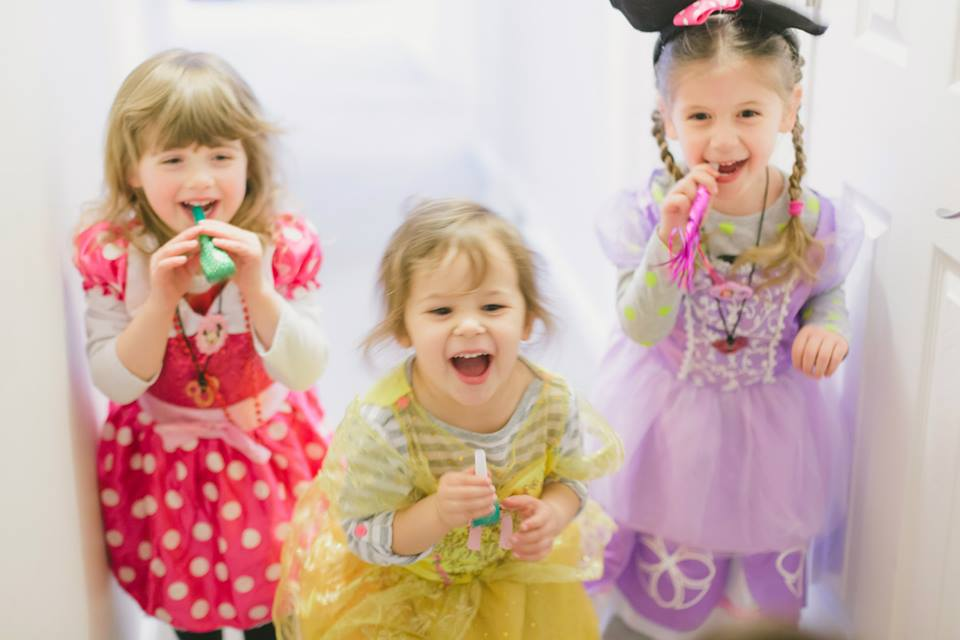
Our celebration included a Disney Side playlist including music from Mickey Mouse Clubhouse, Minnie's Bowtique, Doc McStuffins, and Disney Princesses.  We wore Disney costumes (unplanned, but these girls really know how to show their Disney Side!).  We decorated our house with tons of balloons and Mickey and Minnie decor.  (Did I say thank you to my amazing husband for blowing up every single balloon?  There had to have been more than 50!)  We packed up goodie bags for each of our guests with lots of homemade things such as Mickey Mouse puzzles, Minnie Mouse bubble wands, Pixie Dust play dough, Minnie Mouse ears, and Mickey Mouse necklaces as well as lots of goodies from the Disney Side sponsors.  We served Mickey and Minnie themed food and drinks.  We played with Pixie Dust play dough, colored Disney Junior coloring sheets, made Mickey Mouse sun catchers, and had a Mickey beanbag toss.  We played, we laughed, we smiled, we sang, we danced, we talked, we blew noisemakers, and we watched in awe as two newborn babies slept through it all!

Did I mention we laughed?  We laughed!


Taken right from the Disney Side Celebrations website...

 "Everyone has a Disney Side - that fun-loving adventurous spirit 
that comes out to play when you're feeling the Disney magic!"  

Let me tell you, we felt the Disney magic at our celebration like we never have before!  Here are some pictures to give you an idea of what I'm talking about...


Here's the recipe for our Minnie Fruit Pizza!


You can view our water bottle label tutorial here!


Learn how to make your own Mickey sun catchers here!

Here are instructions for making Mickey Washer Necklaces!


DIY Minnie ears are so easy! Here's a tutorial.


This day would not have been the same without all of those I listed above.  But saying that does not mean that a Disney Side @ Home Celebration needs sponsors, photographers, or amazing balloon blowing husbands!  All you need for a Disney Side @ Home Celebration is a Disney Side... and trust me, we all have one of those!  There is also a lot of great content that you can review and download on the Disney Side Celebrations website to help you plan your celebration and it's being updated often.  Also, follow along on social media ~ facebook, twitter, pinterest, or instagram ~ just follow #DisneySide to get even more ideas!

I've had several of my daughter's preschool classmates ask me when we are going to have our next Disney Side @ Home Celebration.  Let's do it again soon!

You can view even more pictures of our magical day here.

Here's a video with some inside scoop on planning your own Disney Side @ Home Celebration... on a budget!


I received free products in order to host the Disney Side @ Home Celebration.
The opinions expressed here are my own.
Related Posts Plugin for WordPress, Blogger...