Tuesday, November 27, 2012

Dr. Oetker Ristorante Pizza


This month I was invited to join a campaign through BzzAgent to try Dr. Oetker Ristorante Pizza!  As part of my BzzKit I received two coupons for free pizzas and several dollar off coupons to share with friends and family.  

Before my coupons arrived I checkout out the Ristorante website to get a preview of what my flavor options would be... 

Can we say yum?  My mouth was watering even before I received my BzzKit!  One we received our coupons, off we went to the grocery store to see what options they had and ended up choosing Pizza Speciale and Quattro Formaggi.  We were not disappointed with our selection!

Here are the descriptions of our two choices from the company's website...


Pizza SpecialeThis unique thin crust pizza with Pepperoni and Cooked Ham make this pizza a culinary feast.  Edam, Mozzarella and spicy herbs add to the full flavor of this wonderful pizza.


Pizza Quattro Formaggi ~ A delicious blend of mozzarella, Edam, Emmental and blue cheese, complemented by a tantalizing basil seasoning on a crispy thin crust.

As we ate our dinner as a family, we chatted about what we would want YOU to know about our meal...
  • We all thought the pizza tasted great!  This included myself, my husband, and our two and half year old pizza-loving daughter.
  • The toppings were evenly distributed.  With some other frozen pizza varieties in the past, I have spent almost as much time rearranging toppings prior to cooking as I would making my own pizza from scratch!  These toppings were spread out evenly when I took the pizzas out of the packaging and there was minimal rearranging necessary (maybe 2 pieces of pepperoni).  This made for a quick and easy entrance into the oven and no wondering about who would want what piece... there were no pieces that had more or less toppings than others.
  • The crust was crispy but not crunchy.  Know what I mean?  There was a little crisp when we bit into the crust but it didn't make for a hard pizza at all.  Neither was it chewy, or so limp that you had to eat it with a fork.  It was just the perfect combination of crisp and soft.  It's hard to describe but it was impressive!  Historically, I have not been a huge fan of thin crust pizzas but these changed my mind a bit.
  • We didn't have to dirty many dishes.  There was no need to pull out a cookie sheet, a pizza stone, a pizza pan, or anything like that.  These pizzas come out of the box, out of a plastic sleeve, and onto the oven rack.
  • These were done quickly.  They only cook for 12-14 minutes.  Our two and a half year old was tolerant of this wait which is a very important thing!
  • This was frozen pizza.  I'm not going to lie.  We didn't think this tasted like we were in a restaurant or ordered takeout or delivery.  It tasted like frozen pizza.  That being said, it was a frozen pizza we liked.
  • We wished there was more.  These pizzas were fairly small.  Or maybe we just have big appetites?  We only made one pizza per meal and it filled us up - sort of - but we would have eaten more if it were there.  The first meal, my husband and I each had three pieces and our daughter had two.  The second meal, my husband had two pieces and our daughter and I each had three (and she asked for more).  I think we would have all felt more content after the fact if the pizza were just a bit larger.

Overall, I was impressed with Ristorante Pizza and wouldn't mind stocking my freezer with a few more.  I was actually a bit disappointed when we ate the last one!  Besides being tasty, these really made for a relaxing evening for me in terms of dinner preparation and clean up and that is so necessary some days. I actually think the convenience was my favorite part of these pizzas... a convenience that was achieved without sacrificing quality.

Here are some photos from our Ristorante pizza trying experience!


If you give Ristorante a try, let me know what you think!  

You can visit the Ristorante facebook page here and website here.  

And while you're at it, check out BzzAgent, where you can have opportunities to try products for free and share your honest opinion!  You can read more about this kind of thing in my blog post here.

Tin Foil Snowflakes


Oh how I love toddler activities that use products I already have in the house.  A quick and easy set up and clean up made this project a favorite of mine.  My two and a half year old enjoyed it... not as much as I had hoped... but likely only because she wanted to be outside playing in the real snowflakes, not making pretend ones!


What you need:
  • paper
  • double sided tape
  • tin foil

What you do:
  • put double sided tape on paper in the shape of snowflakes
  • provide child with strips of tin foil that they can rip apart and stick to the tape or give them little pieces of tin foil if they don't want to rip it themselves

Original idea found here.

Monday, November 26, 2012

Fried Apples

A very special welcome to the newest member of our holiday menu!  We tried this recipe for Thanksgiving and it was great!  These fried apples are easy to make, pretty to look at, and yummy to eat.  They were a great addition to our meal!

Ingredients:
  • 8 apples (we used Empire since they are my favorite for everything lately)
  • 1/4 cup butter
  • 1/2 cup brown sugar
  • 1/2 teaspoon cinnamon
  • 1/8 teaspoon nutmeg

Directions:
  • Melt butter in heavy skillet over medium-low heat.
  • Add apples, brown sugar, cinnamon, and nutmeg.
  • Saute for 15-20 minutes, or until apples are tender.

Original recipe found here.


Wednesday, November 21, 2012

Homemade Cream of Chicken Soup

Last week I decided to make a recipe that included cream of chicken soup but I quickly realized I had none in the house.  So began the task of figuring out how to make it from scratch... I asked friends, searched the internet, and ended up using this recipe I originally found on Pinterest.  It turned out great!  And given that I had all the ingredients I needed, it was cheaper (and probably healthier) than store bought canned soup... and so easy!  I'm sure many of you are making recipes this week that call for cream-of-whatever so definitely give this a try!  I'll be using this in my Green Bean Casserole.

Here's what I did.  It varies slightly, but for the most part follows the original recipe here.  The original recipe also includes ideas for making cream-of-all-the-other-things...


Ingredients:
  • 2 tablespoons butter
  • 2 tablespoons flour
  • 1 cup milk
  • 1 small pack chicken stock (I used Knorr Homestyle Stock - one pack from a four pack.  The packs say they make 3 1/2 cups of broth so you could probably use less than one, or a half chicken broth, half milk mixture)
  • OR in place of the store bought stock, use your own (see recipe here) or simply make up some broth with bouillon and water
  • You want 1 cup of liquid.  I do 1/2 cup milk + 1/2 cup homemade stock
Hint from original recipe: Use equal amounts of butter and flour and eight times as much liquid.

Directions:
  • Melt butter in a pot
  • Add flour and stir until smooth (about one minute)
  • Add chicken stock
  • Add milk, a little at a time, and whisk over heat until smooth and thickened (the longer you cook, the thicker it will be)
I may never go back to canned cream soups again!

Tuesday, November 20, 2012

*EXPIRED* $15 Kmart/Sears Gift Card Giveaway! CONGRATS MARY!


Recently I was invited to a smiley360 mission to do some shopping at Kmart.  They sent me a gift card to put toward some holiday decorating items as part of Kmart's Decorate it Forward movement!

What is Decorate it Forward?  It is about spreading holiday cheer 
by sharing the gift of decorating and entertaining with family, friends and those in need. 
(from Kmart website)


We visited Kmart a couple of times before making the final decision of how to spend our gift card.  We looked at LED lights for inside and outside the house, beautiful rotating LED lighted artificial trees,  gift ideas, outdoor decorations, tree toppers, and tree skirts.


We decided on a tree skirt because we've really needed a new one for a couple of years and knew we would definitely be purchasing one this year anyway.  They had several nice ones to choose from so my husband and I picked our favorites and then let our two year old make the final decision.  She made a great choice!


We were impressed with the selection of holiday products at our Kmart.  Our store has a large holiday section, conveniently located right next to the toy section and not far from the tool section - our favorite places to visit!  Everything is well marked so just looking down an aisle, you know immediately if you're in the right place.  There are a lot of great deals going on right now, including 50% off that beautiful rotating tree!  We haven't done a lot of shopping at Kmart in the past (with the exception of when I was a kid!) but we've recently moved closer to one and have been frequenting the store a bit more often.  You can get almost anything there... even food!  The rewards I get for shopping there, though, are what really keeps me going back for more.

Kmart has great incentives for shopping their store (and Sears too... did you know they are part of the same family?).  They have a rewards program called Shop Your Way Rewards.  By scanning your card at checkout (just like you do at the grocery store, etc) you earn points based on your spending and when you accumulate enough points you can redeem them for money toward your next purchase!  Sometimes as a Shop Your Way Rewards member you even get special bonus points just for being a member!  Recently they loaded 10,000 points which equals $10 to every member's account that was in the path of Hurricane Sandy.  Isn't that fantastic?


Last week in the mail I got a postcard offering me $10 back in rewards with my next purchase.  So this is how I worked my tree skirt deal...

On Saturday I went to Sears and purchased a pair of boots I've been wanting.  I handed them my postcard and they scanned that in with my purchase.  After I left the store, I checked my Shop Your Way Rewards account and sure enough I had a credit of $10.32 on my card!  (The .32 was left over from past purchases as you earn a percentage every time you shop - 10 points for every dollar you spend - redeem 100 points for $1).  The next day we went to Kmart to purchase our tree skirt for $24.99.  They scanned my SYWR card and check out and then rang up the tree skirt.  I asked if I had any rewards I could apply to the order so they looked and sure enough I had the $10.32 and told them I wanted to use that.  That brought my total down to $14.67 plus tax and I used my $15 gift card from smiley360 and a little bit of change to pay the difference.  Minimal effort but huge savings!

Here's the most exciting part of this whole thing... Kmart and smiley360 have offered me a $15 gift card to share with YOU so that you can also experience the fun of Decorating it Forward this holiday season!  I'd love for you to check out what Kmart has to offer and enter to win this gift card below.  I only have one to share but you can earn lots of entries!  Winner will be announced on Monday, November 26!


a Rafflecopter giveaway
Click here for more information on Shop Your Way Rewards and how YOU can Decorate it Forward this holiday season with Kmart!

Join smiley360 for opportunities to try new products and share them with others! (you can read my blog post on this sort of thing here)

Good luck!

Monday, November 19, 2012

Baking with kids...

I'm not sharing a favorite recipe in this post, but just some words of encouragement.

Yesterday we made Snickerdoodles (Betty Crocker pouch mix - gasp!).  As you have probably gathered, I try to do a lot of baking and I try to include our two year old daughter in the process as much as possible.  But I will admit that I usually include her in the less complicated parts of the process - like pouring things into the mix (with my assistance) or stirring (with my assistance).  She definitely loves it.  But yesterday, I decided to give her a job that included more of her and less of me, rather than the other way around.

She had the job of covering the cookies in the cinnamon sugar topping prior to baking.

It may seem like a small thing, but this was a huge deal for both her and me.  I cannot tell you how excited she was to have this special job... she was literally trembling with excitement.  Her joy filled me with joy and it was an eye opener for me.  Sometimes things don't have to be just-so.  It's okay if things get messy.  It's okay if she decides that the cookie balls need to be squeezed before baking.  It's okay if she sprinkles cinnamon all over the pan.  It's okay if she decides she only wants to cover half of a cookie rather than the whole thing.  It's okay if she gets dough with raw eggs on her hands.  It's okay if she wants to line up all the cookies in one line instead of evening placing a dozen on the pan in three rows of four.  And it's even better than okay if she feels like a million bucks and like there is no possible way I could ever make Snickerdoodles without her!

I'm sure many of you will be doing lots of baking this week in preparation for Thanksgiving.  I sort of become like a machine sometimes just trying to get it all done.  But really, those special moments with your little one are so much more important than making sure everything is picture perfect.  Take time for today.  Use this as a learning and growing experience for you both.  I hope I'm able to take my own advice!


Also, on a slightly different note, but similar...

We love the Fisher Price iPhone app called Little People Learning Market.  It has two different parts to it - shopping and baking.  Our daughter always chooses the baking portion and she has learned so much from it!  Combined with the baking she does with me, she knows the steps to baking.  She knows that we need to gather the ingredients, dump them in, and mix them up.  And she can usually guess what we will need!  Flour, eggs, sugar, etc.  She doesn't play apps on the phone a lot but this is one she loves, so if you're looking for a great, FREE, learning app, we recommend this one!

Wednesday, November 14, 2012

Sour Cream Apple Pie with Streusel Topping

This recipe for Sour Cream Apple Pie with a delicious streusel topping is one of our absolute favorites.  Honestly, I probably make it more than once a week, on average, during the fall and winter and I'm not too ashamed to admit it! It is so easy and so delicious. I hope you love it as much as we do... I'm pretty sure you will!


Ingredients:

Filling:
  • 1 cup sour cream
  • 2/3 cup sugar
  • 2 tablespoons flour
  • 1/4 teaspoon salt
  • 1 teaspoon vanilla
  • 1 egg
  • 3 cups peeled, sliced, tart apples
  • 1 9" unbaked pie shell, frozen or chilled in the freezer for at least 30 minutes

Topping:
  • 1/2 cup brown sugar, packed
  • 1/3 cup flour
  • 1/4 cup butter, room temperature
  • 1/2 teaspoon cinnamon

Directions:
  • Preheat oven to 400 degrees.
  • Mix together all topping ingredients until mixture resembles coarse crumbs.  Chill until needed.
  • Beat together sour cream sugar, flour, salt, vanilla, and egg (can beat by hand).
  • Add apples, mixing carefully to coat well.
  • Put filling into pie shell.
  • Bake at 400 degrees initially for 25 minutes.
  • Remove from oven and sprinkle with cinnamon crumb topping.
  • Bake for an additional 20 minutes.
  • Let cool for one hour before serving.
Store in the fridge. We prefer to eat it cold!

Original recipe found here.

Friday, November 9, 2012

Chocolate Chip Cookies


I suppose chocolate chip cookies aren't necessarily a "holiday" recipe, keeping with my holiday recipe theme, but I think it's a recipe everyone should have.  I do a lot of cookie baking and giving at Christmas time and having good recipes for all the different cookies I pull together is very important to me.  Chocolate chip cookies are one of those things that I always assumed everyone just inherently knew how to make (including myself).  But is this really true?  I mean it's a basic cookie, but it's not really fail-proof (at least not with me) and although I assumed I knew how to make them, I can assure you this was not actually the case!

One of the things I've noticed about chocolate chip cookie recipes, like so many others, is that if you look through your cookbooks, google, ask your friends and family, look on the package of chocolate chips, etc, every recipe you come across will be a little bit different.  Figuring out the best one is a daunting task!  When I first got married I embraced the "baking wife" persona and decided I knew how to and would bake everything.  I decided on chocolate chip cookies for a church potluck and it was a HUGE failure.  I can vividly remember having a full out melt down in our apartment, throwing things, sobbing on the bed, etc etc etc.  As I was baking chocolate chip cookies last night I asked my husband if he remembered those moments as well as I did... thankfully he told me he must have blocked them out of his mind forever.  It was very very bad!  I don't remember what recipe I used that first day but I remember telling my aunt, who I have always believed is a baking expert, about this awful experience and she gave me some pointers that have made all the difference (like using half butter, half crisco instead of all butter).  I have also learned that you don't have to follow everything as it's written... you try different things and then write your own recipes (hence the handwriting in my fancy cookbooks).

So here is the recipe I use; a combination of suggestions from my aunt, my own experience, the package the chocolate chips come in, and good old Betty Crocker.  Good luck!  I hope it works as well for you as it does for me, but if you have pointers of your own, please share!

You can fancy up this recipe with different chocolate chips if you prefer.  We made some with mint chocolate chips last night.  You could also use peanut butter, peppermint, or whatever you find that appeals to you.  There are lots of yummy looking holiday ones out right now!

Ingredients:

  • 3/4 cup granulated sugar
  • 3/4 cup packed brown sugar
  • 1 stick butter, softened
  • 1/2 cup crisco
  • 1 teaspoon vanilla
  • 2 eggs
  • 2 1/4 cups all-purpose flour
  • 1 teaspoon baking soda
  • 1/2 teaspoon salt
  • 1 bag (12 oz) chocolate chips (2 cups)

Directions:

  • Heat oven to 375 degrees.
  • In large bowl, beat granulated sugar, brown sugar, butter, crisco, vanilla, and eggs with electric mixer on medium speed or mix with spoon.
  • Stir in flour, baking soda, and salt.
  • Stir in chocolate chips.
  • Drop dough by rounded tablespoonfuls onto ungreased cookie sheet (about 2 inches apart).
  • Bake 8 minutes (they will not look done but you'll see a little tiny bit of golden color on top).
  • Let sit for 2 minutes on cookie sheet.
  • Remove from cookie sheet to cool on wire rack.

Here are my favorite pointers from my Betty Crocker Cookbook...


Thursday, November 8, 2012

Cinnamon Roll Pie Crust


I saw this recipe for Cinnamon Roll Pie Crust on Pinterest last year and gave it a try.  It turned out to be one of my favorites throughout the holiday season!  How could it not be?!  I will be honest that it wasn't even so much the taste as it was the look!  Everyone will be impressed with your skill if you pull this masterpiece together and it really is so so easy.  I made pumpkin pie in mine but really you could do anything you would typically bake.  The original recipe can be found here.

Ingredients:
  • 1 Pillsbury Refrigerated Pie Crust
  • 2 teaspoons cinnamon
  • 1 tablespoon unsalted butter, melted
  • 1 large egg white + 1 teaspoon water, beaten
Directions:
  • Roll pie crust on a floured surface (another shout out to my pastry cloth!)
  • Brush with butter
  • Sprinkle with cinnamon
  • Roll up tightly
  • Slice into 1/2 inch rounds like mini cinnamon rolls
  • Press mini cinnamon rolls, flat side down, evenly into the bottom of a 9 inch glass pie plate
  • Make sure there are no spaces between the rolls
  • Brush lightly with egg white / water mixture
  • Fill with your favorite filling and bake according to that recipe 
I'll try to add some more detailed pictures to this post when I make this next!  You can find some on the original recipe post here.

Wednesday, November 7, 2012

Crock Pot Cornbread Dressing

The holidays are coming soon and it's time to start planning your menus if you haven't already!  Do you have favorites you make year to year?  We definitely do and we spend all year looking forward to making and enjoying them!  There are a couple of recipes that my husband has given me strict orders not to ever share so sadly I will keep those off the internet but I do have some I'm willing to share so stay tuned over the next several days for those.

This recipe for Cornbread Dressing is one of my favorite holiday recipes.  It is super delicious and super convenient... it is made in the CROCK POT!  What a novel idea since trying to time everything that needs to go in and out of the oven is quite a task.  Taking one thing off of that list is huge sanity saver.


I originally found this recipe in the November 2010 version of Southern Living.  You can view an online version here.

I will copy the recipe over here with some hints of my own... enjoy!

Ingredients:
  • 5 cups crumbled cornbread (according to the original recipe 2 packages of Martha White yields 5 cups, I believe I use 2 packages of Jiffy and have a little bit left over)
  • 1 (14 oz) package herb stuffing 
  • 2 (10 3/4 oz) cans cream of chicken soup (I have recently started making my own, recipe here)
  • 2 (14 oz) cans of chicken broth (I make my own broth with boiling water and chicken bouillon cubes, 3 5/8 cups equals 2 14 oz cans)
  • 1 large sweet onion, diced
  • 1 cup diced celery
  • 4 large eggs, lightly beaten
  • 1 tablespoon rubbed sage
  • 1/2 teaspoon pepper
  • 2 tablespoons butter, cut up

Directions:
  • Combine first 9 ingredients in a large bowl.
  • Pour mixture into a lightly greased 6-quart slow cooker. (I would give it more than a light grease.)
  • Dot with butter.
  • Cover and cook on low for 4-6 hours or until set and thoroughly cooked. (Definitely check it after 4 hours.  Mine tends to stick and burn to the sides of my crock pot if I'm not careful so this year I plan to decrease the cooking time and increase the greasing!)
  • I make my cornbread the night before and combine all of the dry ingredients in a bowl and then in the morning add everything else.  This saves time and keeps me out of the kitchen while my husband is prepping a turkey!

Tuesday, November 6, 2012

Burt's Bees Intense Hydration Line


Last month I was invited to join a BzzAgent campaign for the Burt's Bees Intense Hydration Face Care line.  I've blogged about BzzAgent before (you can read here) but basically they are a company that helps manufacturers reach out to consumers, offering them a chance to try products and give their honest opinions on them.


I was very excited to be offered this campaign!

Here's what came in my Bzz Kit:
  • Full Size Cream Cleanser
  • Full Size Night Cream
  • Full Size Treatment Mask
  • Samples of Day Lotion
  • Samples of Night Cream
  • Coupons

As soon as I knew my Bzz Kit had shipped, I ran to the mailbox everyday in hopes that it had arrived!  Once it did, I ripped the box open and tried it immediately!  This was a couple of weeks ago.  I wanted to write a review about the product as soon as I squeezed a little bit of cleanser onto my hand (it smelled so good!) but I also knew that I could give a more accurate representation after using it for a little while longer and seeing how my skin was actually going to react to it, beyond the first sniff.

I do not necessarily consider my skin to be very dry overall.  I do use a moisturizer daily to keep from seeing dry flakes but in general I would consider myself to have combination skin.  Certainly the winter months bring about more dryness and without moisturizer I'm definitely dealing with some flakiness.  My hope was that this line would take care of that but not be so heavy and greasy that my pores would clog and I'd be dealing with a disaster.

After a couple of weeks, it's safe to say that I love this face care line!  Like I said initially, I really do love the smell.  Clary Sage is what's called but what it smells like is heavenly.  It smells refreshing, clean, and just overall yummy.  Here's some info on Clary Sage for those of you, like me, that have never heard of it before.  Apparently that (over to the right) is what it looks like, and this (down below) is what it's deal is...

Clary Sage: A Force of Nature
Deep in the windswept hills of the Mediterranean, a lone plant fights for its life against the elements. Clary Sage survives and thrives in spite of its harsh surroundings, thanks to the plant's fierce will and exceptional ability to adapt and retain moisture. This remarkable botanical is the inspiration behind Burt's Bees Intense Hydration Face Care line — the brand's natural ode to soft, supple, revitalized skin.

After getting beyond the scent of the face wash, I will admit that I was a little bit nervous initially about the texture.  I'm used to using a foaming cleanser and using a cream cleanser is a little bit out of my comfort zone.  Actually, I was pretty convinced that my skin was going to feel and look greasy and that I was going to be completely breaking out with acne within the first day.  

I was wrong!  The cleanser was soft and creamy but washed right off and left my skin feeling very hydrated - but not greasy.  And in terms of breakouts, I have not experienced anything out of the ordinary with the exception that my ordinary blemishes are much easier to cover up because I'm not having to deal with trying to apply makeup to flaky dry skin!  

The Day Lotion, Night Cream, and Treatment Mask are all just as great!  The line also includes an eye cream that I'm pretty sure I will be looking to add to my skin care regimen as well.  There is nothing disappointing to me about using this line and I'm pretty confident that it has officially replaced what I was using previously.  

I have never used Burt's Bees products in the past.  The have always been appealing given their 99.0% all natural ingredients.  You won't be surprised to know that my biggest reason for not using them is because I haven't come across a deal for them that allows me to get them for free or really inexpensive! That being said, when new products hit the market and companies want to get them out there you better believe they promote them to draw you in.  A little searching revealed a deal on this product that you can't beat!  Yippee!

Here's how you can try the Burt's Bees Intense Hydration Cleanser for only 99 cents!
  • At Rite Aid, the cleanser goes for $9.99
  • Burt's Bees has coupons that you can print from their facebook page for $3 off (if you can't print let me know because I still have $3 coupons from my Bzz Kit to share!)
  • Rite Aid has a coupon that you can print from their Video Values website (watch the video, earn the coupon) for $3 off and you can combine this Rite Aid coupon with the coupon from facebook above
  • So now you have $6 off something that regularly goes for $9.99 and you will pay $3.99 (already a good deal)
  • But THEN you can submit for a rebate through Rite Aid for $3 back when you buy a product from this line and guess what?!  That's right!  You've got the cleanser for 99 cents!  GREAT DEAL!  
  • Needless to say, if you want to try this product, this is the time!  Even though I still have plenty left, I plan to take advantage of this deal for sure since I can't guarantee that a deal this great will come along on a product in this price range when I run out.
So there you have it.  I'm so excited that I got to try the Burt's Bees Intense Hydration Line through BzzAgent and even more excited that I love it as much as I do!  You should give it a try (at the very least try the cleanser using the deal I listed above).

Also, if you haven't joined BzzAgent yet, I will give it another shameless plug.  It's really amazing.  I honestly would have never tried this product if it weren't for them giving me the opportunity to do so.  I currently have four Bzz Campaigns going, all of which include trying very cool things without spending a penny ~ Burt's Bees Intense Hydration, Green Mountain Fair Trade Coffee, Ristorante Pizza, and Claritin-D.  If you are not getting in on this, you are missing out.  Let me know if you need any help getting started!

Chicken Spaghetti Casserole

This is a oldie but goodie!  We used to make this Chicken Spaghetti Casserole all the time when I was younger and when I was desperate for something different to cook a few days ago I decide to dust off the old recipe card and make it again... it had been years!  I won't wait so long to fix it again next time.  We loved it, as always.  I will warn you that because this is an old favorite, there are not many official measurements included.  If you need more details than I have provided, let me know!


Ingredients:

  • Boneless chicken breasts (maybe 1 or 1.5 pounds)
  • Salt
  • Pepper
  • Sage
  • Onion Powder
  • Garlic Salt
  • Bay Leaf
  • 2 cans of cream of whatever-you-are-in-the-mood-for soup (I used chicken and celery)
  • 8 oz spaghetti
  • Shredded cheese (I used about 1 1/2 cups shredded cheddar)

Directions:

  • Put chicken in a pot and cover with water, sprinkled with all the seasonings until it smells yummy (salt, pepper, sage, onion powder, bay leaf, whatever you think smells good - you are making a delicious chicken broth)
  • Boil until chicken is cooked through
  • Take chicken out and set aside; cut into bite size pieces
  • Take two cups of broth out and mix in a bowl with the 2 cans of cream soup
  • Cook spaghetti in the rest of the broth (add more water if you need to) and drain when done
  • Put spaghetti in bottom of 9x13 casserole dish
  • Arrange bite size pieces of chicken on top of spaghetti
  • Sprinkle garlic salt and onion powder over chicken
  • Pour sauce made from broth and soups on top
  • Sprinkle with shredded cheese
  • Cover with foil and cook until cheese is melted and casserole is bubbly (maybe about 30 minutes or a little longer... I honestly don't remember how long I cooked it for but everything is already cooked, you just need to get all the flavors mixed up together and the cheese melted.)

This is good comfort food... let me know how it turns out!

Friday, November 2, 2012

Peanut Butter Cookies (4 ingredients!)


This recipe for Peanut Butter Cookies with only four ingredients hit Pinterest like wildfire recently so of course I jumped on the bandwagon and pinned it.  As I've said before, I think I have hundreds of recipes pinned on my "to try" board (yup, just checked.... 639 to be exact) but only a small percentage of them will I actually try.  This one I had a feeling I would and when my sister told me she tried them and liked them, I knew it was time!

Here's my favorite part about this recipe.  It doesn't use flour, butter, or oil!  I go through those ingredients SO fast at this time of year when I do so much baking.  If I come across a recipe for cookies that doesn't use those things, I know I have found a winner!  This is also a great option for our gluten free friends out there.

This recipe is very easy and you can whip it up FAST!  I only got 16 cookies out of it so if you want more, just double it.  Enjoy, and let me know how yours turn out!

Ingredients:

  • 1 cup peanut butter
  • 1 cup sugar
  • 1 egg
  • 1 teaspoon vanilla extract

Directions:

  • Heat oven to 350 degrees.
  • Combine all ingredients with mixer.
  • Drop tablespoonfuls onto baking sheet.
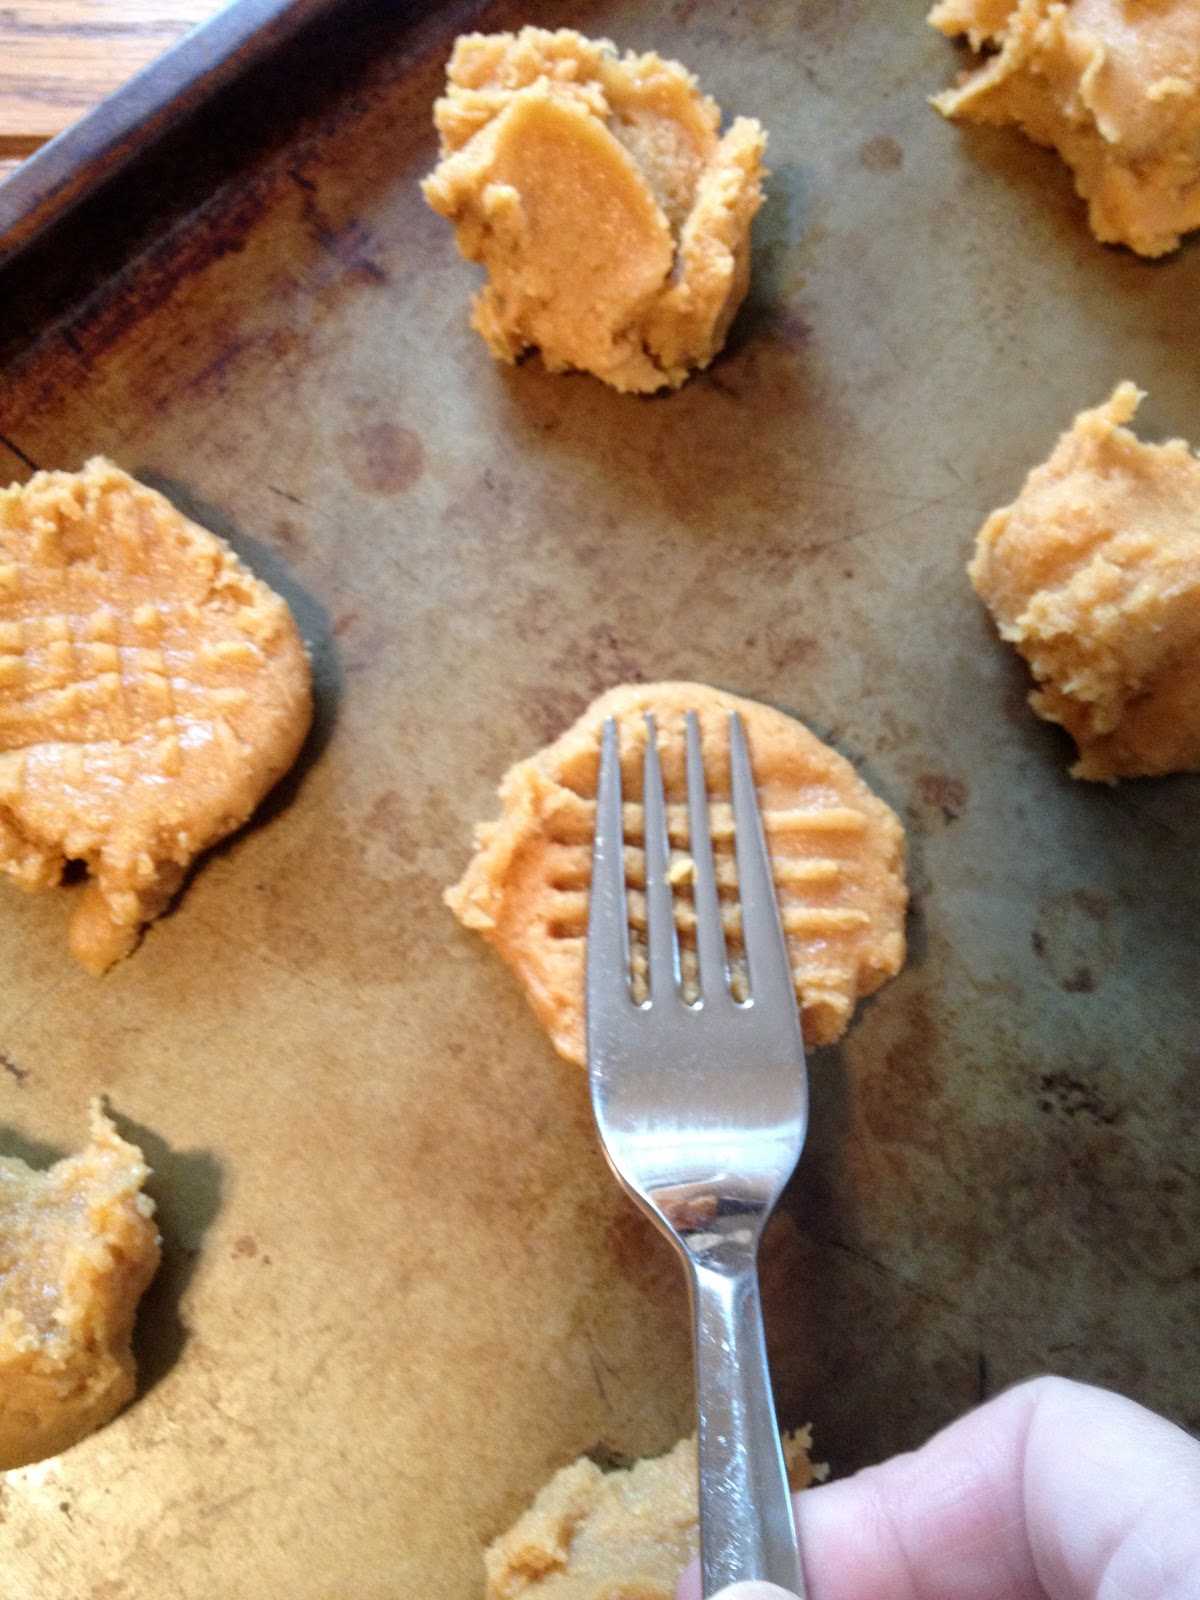
  • Use fork to flatten dough in crisscross pattern.
  • Bake for 10-12 minutes until golden brown around the edges.
  • Let sit for 2 minutes on baking sheet prior to moving to wire rack.

You can find the original recipe here.


Thursday, November 1, 2012

Soap Clouds and Bath Soaps

You may have heard that Ivory Soap floats... but did you know it could do this??


Yup!  Just a minute or two in the microwave and you have a soap cloud!

And a with a little bit of added water, food coloring, and handiwork you have some fun soaps for bath time!


What you need:

  • a bar of Ivory soap
  • wax paper
  • microwave
  • water
  • food coloring
  • cookie cutters

What to do:

  • Place the unwrapped soap on some wax paper in the microwave
  • Microwave for 2 minutes, watching it grow (it might take less that two minutes... the cloud above was from about one minute but I stopped it a little prematurely... when it stops growing, it's done)
  • Have fun exploring!  What does it look like?  How does it smell?  How does it feel?  You can try coloring it, painting it, crushing it, etc...
  • To make soaps, crush the cloud into a bowl
  • Add a little water and stir/squish together until it's the consistency of pie crust
  • Add a drop or two of food coloring if desired
  • Squish into cookie molds and let dry 


Some notes:

  • Only Ivory works with this so don't try other kinds.  If you read comments on other blogs featuring this activity you will see that not only will other kinds of soap be unsuccessful, they may be dangerous.  
  • The fresher the soap the better.
  • Do not leave this unattended in the microwave.  If it gets too big or starts smoking, turn it off!
  • Put the soap on a piece of wax paper, plastic wrap, paper towel in the microwave.  Do not use foil!
  • Be careful taking it out of the microwave just in case it's hot.  Mine hasn't been hot but I would hate for someone to try this, get burned, and tell me I should have warned them...

You can find the original post where we got our ideas here and you can read about the physics of Ivory Soap here.  Have fun!
Related Posts Plugin for WordPress, Blogger...